For FANUC integrators and end-users
Eliminate the PLC and panel HMI from your cell.
Design, build and run custom operator screens directly on the FANUC Tablet Teach Pendant without writing a single line of code.
Creating an HMI with HMI Forge on the FANUC CRX tablet
The case for a custom HMI
Your operators shouldn't have to know their way around all the FANUC menus.
That's just asking for trouble: changing values they shouldn't or getting a call at 2am because they can't find the reset button.
The answer is a custom HMI that provides everything an operator needs and nothing they don't.
One option is to develop a plugin using FANUC's Plugin SDK, but you're going to have to read the manual, learn KAREL, HTML, CSS and JavaScript, and write a bunch of code and configuration boilerplate. It'll take you days or weeks to get up and running. An experienced developer will cost thousands of dollars.
HMI Forge removes all that pain. Just install the plugin, and you can build a complete operator screen in ten minutes, on the tablet, without writing a single line of code.
What you're actually buying
The robot you already bought is the hardware. Stop buying it twice.
HMI Forge is a plugin built on FANUC's Plugin SDK. It lives on the controller and runs on the Tablet TP that came in the box. Here's what disappears from your next quote.
| Comes off the BOM | What it typically runs |
|---|---|
| Industrial PC or second panel HMI | $1,500–$5,000+ |
| Gateway box, enclosure, wiring | Hardware + hours |
| Per-seat runtime licenses, plus a server to host them | Every year, forever |
| A web developer to build and maintain custom screens | The line item nobody quotes |
The cell gets a better operator interface while the bill of materials gets shorter.
Not just cobots
Your yellow robots are invited too.
HMI Forge runs on the Tablet TP, so your
traditional FANUC robot can run it too if you have the Tablet TP option (S527).
Everything on this page still applies: same editor, same controls, same tag binding,
same USB workflow.
One HMI tool across the whole fleet
Cobots and industrial arms both, instead of one approach for the CRX and a PC-based HMI for everything else.
Screens travel on a USB stick
Themes, tag lists and layouts move between robots. Build the operator screen once; reuse it on the next cell regardless of what color the robot is.
Retrofits get interesting
Adding the S527 option to an existing robot is a much smaller line item than adding a panel HMI, an IPC, and the licenses to run it.
How it works
Design. Bind. Deploy. Never leave the robot.
Design on the tablet
Touch-first drag, drop, marquee and resize — built for fingers, not a mouse. Prefer a mouse? It also runs in the browser through iRProgrammer.
Bind to live robot I/O
Wire controls to FANUC signals — DI/DO, registers, position, system variables — with
{tag} interpolation, expressions and alarms. Preview against live or simulated values.
Deploy on the controller
Hit Save, and it can immediately run on the tablet. Move documents, themes and images between cells or ROBOGUIDE on a USB stick. No network required.
There's no build step because there's nothing to build.
The document you edit is the document the operator runs. No compile, no export, no "why does it look different on the floor?" — what you saw in the editor is what's running in production.
The editor
Three things that save you at 4:45 on a Friday.
The editor is touch-first by design — built for fingers, not a mouse. Lay a screen out at a desk during development, then adjust it standing at the machine, on the same tablet the operator will use.
Validation that catches mistakes before the robot does
Unknown tags, broken expressions, missing images, program names that aren't on the controller, and touch targets too small for a finger.
Conditions without code
Small expressions like {speed} > 80 drive colors, visibility, lamp states, label text and alarms. A
tag picker inserts everything at the cursor.
A true 1:1 preview with no robot attached
Not a mockup — it's the same runtime the operator gets. Drive tags by hand, watch the screen react, and demo the HMI before the cell exists.
Screen one
Done in two controls, before lunch.
The classic first screen — pick a program, start it, stop it — is two drag-and-drop controls. No dev environment, no code, no build step.
A Dropdown for the program
Pointed at the controller's live program list, filtered to a prefix like PICK_ so
operators only see the programs meant for them. The selection writes straight to a premade system tag.
One Program control
Start, Hold, Reset and Abort arrive pre-wired to machine state. Start lights while the program runs, Hold lights while it's paused. Nothing to declare, nothing to connect.
Screen two is where it gets good.
I/O Status. Manual Functions. Production trends. Alarm history. Backup the robot with one click. A live 3D view of the robot. Easy to add in just a few taps.
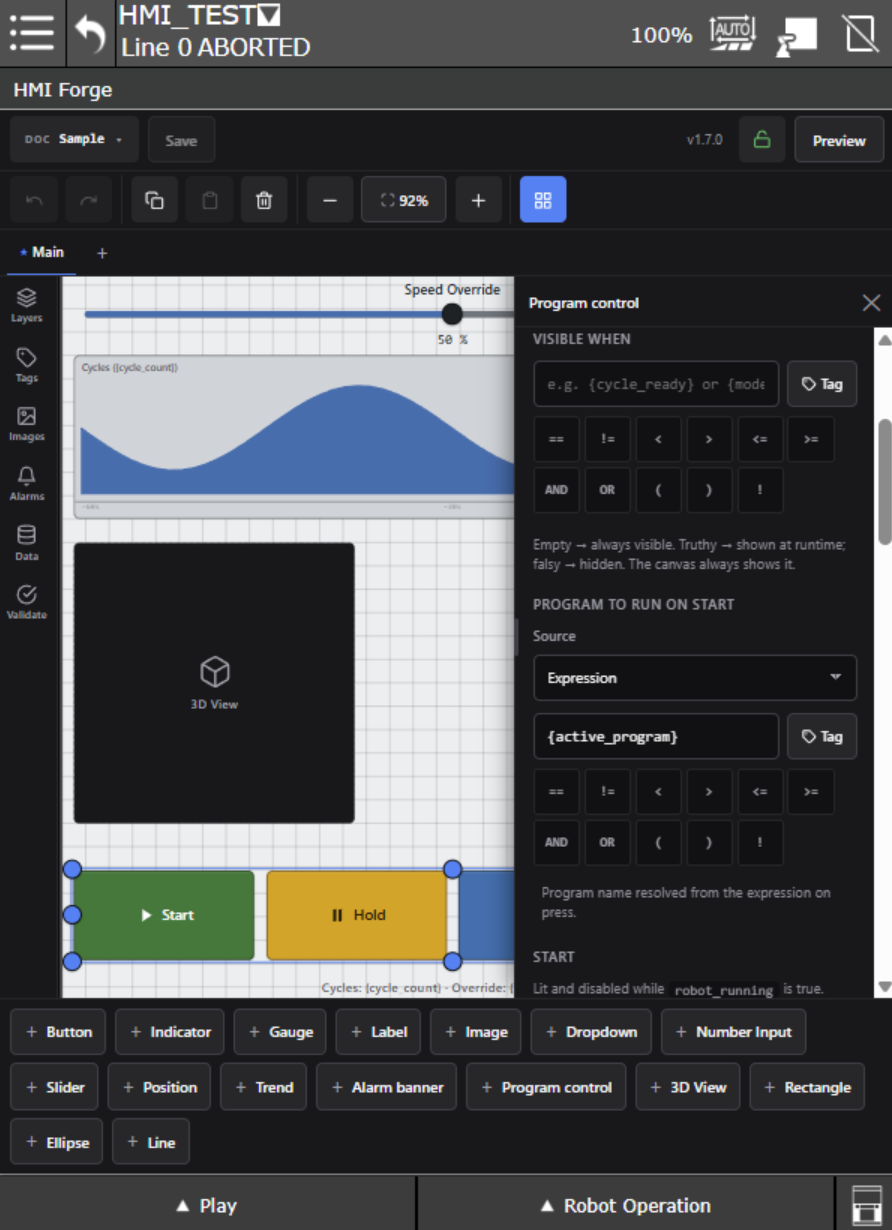
Laying out a screen in the HMI Forge editor
Controls
Sixteen controls. Every job an operator screen needs.
drag → drop → bind by name
You don't need to memorize a parts list. Every control is drag-and-drop, binds to live robot I/O, and follows your theme. What they add up to:
Run the cell
The canonical Start / Hold / Reset / Abort row as one pre-wired control, buttons that write tags or launch TP programs, and dropdowns fed by the controller's live program list.
Watch the state
State-driven indicator lamps, gauges with color thresholds, rolling trends, live position, images that change with the machine, and the real FANUC 3D view embedded on your screen.
Tune the process
Keypad entry clamped to a safe min and max, and sliders with a live readout. Operators adjust what you let them adjust, inside limits you set.
Catch the faults
Define alarms once at the document level; a banner always shows the worst active one, styled by severity, with a history overlay behind it.
Plus labels with live values inline, and rectangles, ellipses and lines for structure. See every control in detail →
Binding
Bind by name, not by address.
A tag maps a friendly name to a real address. Screens read in plain language, and when the cell gets rewired you change one tag — not every control that touched it.
part_presentRI[1]
Registers, I/O, positions and named system values are all fair game, and you can bulk-import tags from a CSV.
Questions
What integrators ask on the first call.
If yours isn't here, the docs go deeper than this page does.
What software options do I need to order from FANUC?
None. HMI Forge is a plugin developed with FANUC's Plugin SDK. It installs from a single file via FANUC's Plugins menu.
What the robot does need is a Tablet TP. Every CRX ships with one; on a traditional FANUC robot it's
the Tablet TP option, S527. The minimum FANUC software version is
v9.40P/65. You can check your robot via
Menu > Expand All > Status > Version ID.
Can I really build a screen on the teach pendant, with no keyboard?
That's the whole design. Marquee multi-select, long-press to add or remove from a selection, align and distribute tools, a layers panel, groups, per-control lock, and 50-deep undo/redo — all finger-driven, no right-click anywhere.
If you would rather use a mouse and keyboard, put a laptop on the same network and log in with iRProgrammer.
Do I have to restyle every HMI from scratch on the next job?
No. A 21-token, intent-based theme drives every control, so you define your house style once and every screen inherits it. Themes export and import over USB, so it travels to the next cell.
What stops an operator from editing the screens I built?
Two locks, and the built-in one needs nothing from FANUC: give the editor a password and it serves the runtime only. Operators get the screens you built, and the editor behind them isn't reachable.
If the controller has FANUC's Password Protection option, J541, the lock becomes the
controller's own. HMI Forge writes the passlvl.xml file for you. Once it's imported, an
operator keeps full use of the runtime but can't open the editor at all. Higher user levels keep their
access.
Setting up Password Protection is documented step by step.
Can an operator back up the robot without calling me?
Put a backup button on the HMI, and one press writes a full controller backup to a timestamped USB directory.
One screen won't cover my cell. How far does a document go?
A document holds as many screens as you need, with tabs and a start screen, in portrait or landscape. Controls copy, paste and duplicate across screens, so a working layout becomes the template for the rest.
I already have 200 tags in a spreadsheet. Do I retype them?
Import them as CSV in one pass. Documents, themes and tag lists all move over USB, and an image asset library lives on the controller alongside them.
My cell is air-gapped. Does any of this need internet?
None of it. Everything runs on the controller.
Who builds it
Websites since 2000.
FANUC robots since 2008.

ONE Robotics Company is just one person: Jay Strybis. He has been designing and building websites since 2000 (possibly earlier), started his career at FANUC in 2008 and has consulted on robotics full time since 2012.
The CRX plugin system needs both halves at once — web development and robot programming — which is why he started building CRX plugins for other companies in 2023. HMI Forge is the first of several planned plugins by ONE Robotics Company.
The ONE Robotics Company website has been a reference for engineers learning to program FANUC robots since 2013 and features several free and open-source tools for FANUC robot development. Jay's book, Robot Whispering: The unofficial guide to programming FANUC robots, was published in 2018 and has been read by engineers at more than 600 companies.
Pricing, plainly
$950
First robot
Editor and runtime, one plugin.
$650
Each additional robot
Whenever you add them — your rate is locked when you buy.
The terms
- One time, per controller, perpetual
- Works offline — nothing phones home
- No renewal or runtime fees. The screens you build keep running for the life of the robot.
Two weeks free on your own robot before you decide.
Fleets, training centers and demo cells work differently — get in touch.
The demo
Tell me about your cell. Watch its screens take shape.
A demo starts with your cell, not mine. You describe what it does, and together we sketch out what your operator needs to see and touch — the layer the palletizer is on, gripper open or closed, a part-present lamp, a speed override with limits.
Then we build the screen.
Live, bound to your signals — and the first working version takes about five minutes, because that's genuinely how long it takes.
Worst case: you spend half an hour and learn exactly what the Tablet TP can do.
Best case: you watched your operator's screen come to life in minutes, and you know how easy it is to build.
After the call, take two weeks with HMI Forge on your own robot and build the real thing. If it isn't right for the cell, the trial simply expires — nothing keeps running, and nothing to cancel.
Not ready for a call
Get the FANUC notes instead.
Occasional writing from Jay on programming FANUC robots, CRX plugin development, and what HMI Forge is learning in the field. No schedule, no filler, unsubscribe in one click.
Robot programming notes, not product announcements.